Garden Planter Box Plans
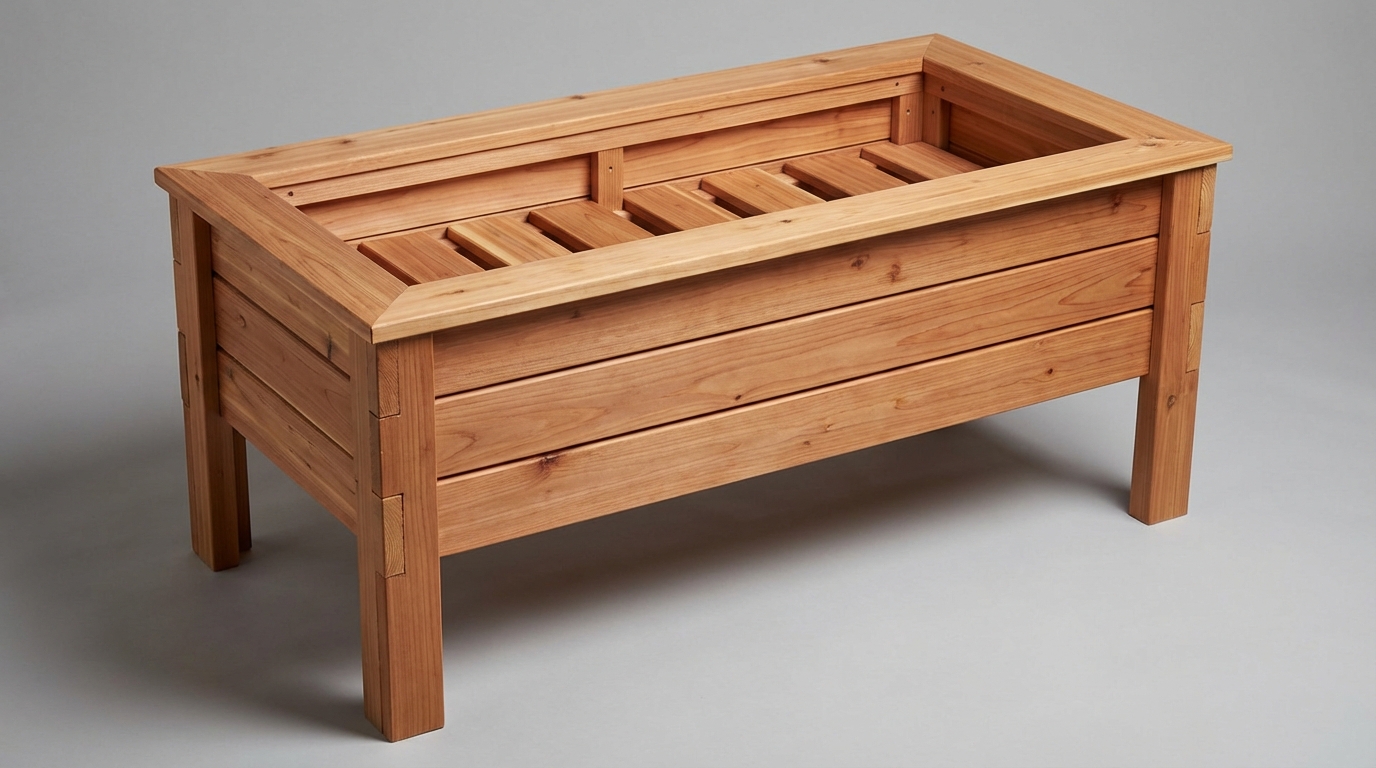
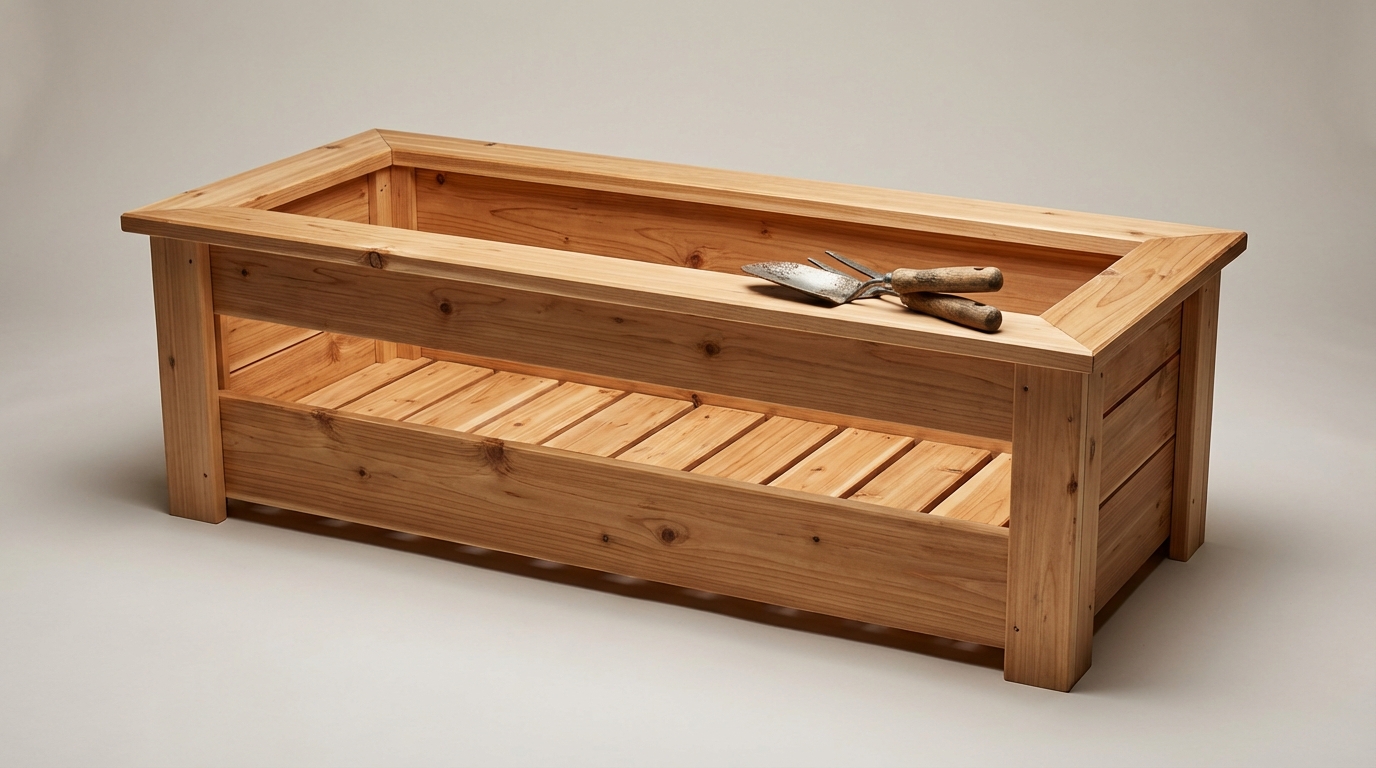
Classic Cedar Planter Box
A sturdy, elevated 36x18 garden planter with a clean mitered top cap and slatted drainage bottom.
ℹ️ AI-generated plan — images are illustrative. Cut list and steps are the primary reference.
Step-by-Step Plan
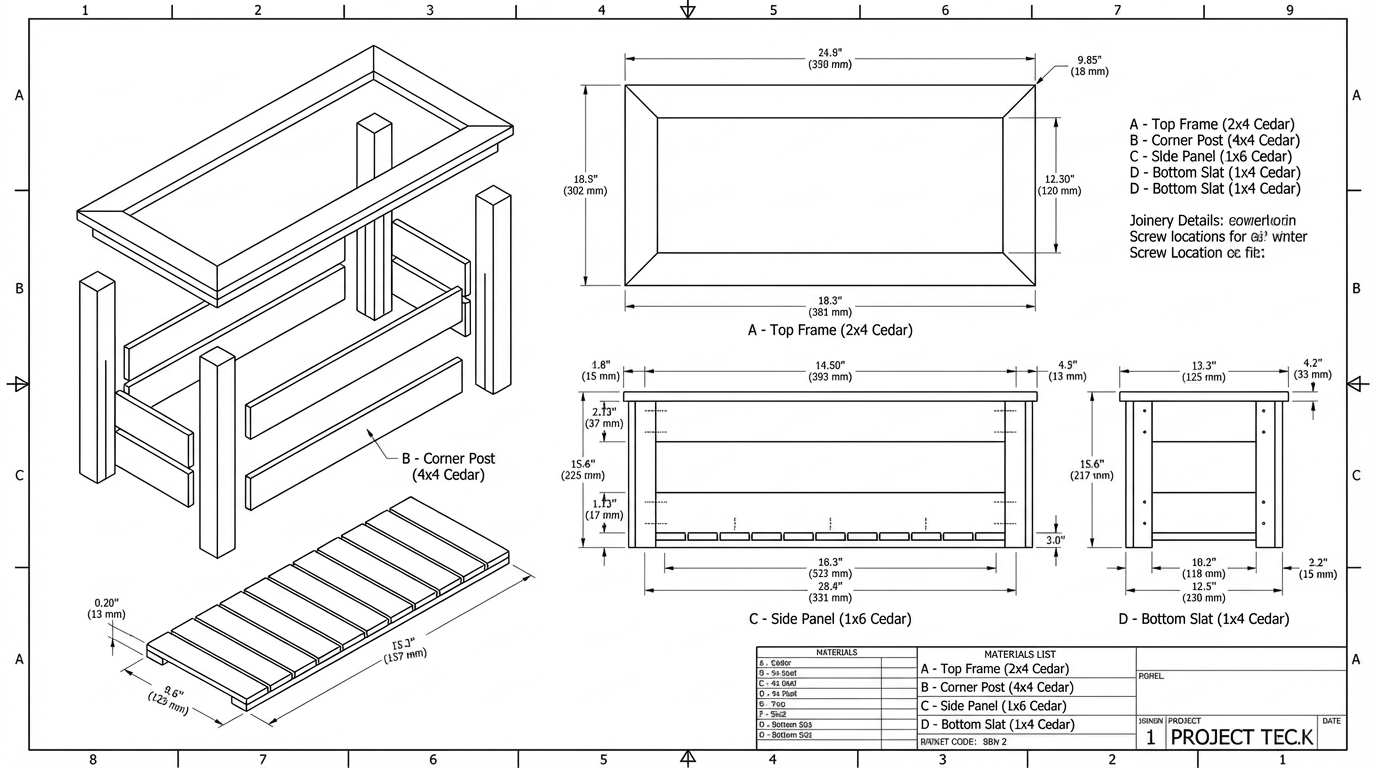
- 1 Cut all four 2x4 legs to exactly 20 inches in length. Sand any rough edges to prevent splinters.
- 2 Assemble the front panel by laying three 36-inch 1x6 boards face down, edge-to-edge. Place two 2x4 legs on top so their wide (3.5-inch) face is flat against the boards. Inset the legs exactly 3/4-inch from the left and right ends of the boards, and flush with the top edge. Secure with 1-1/4-inch exterior screws. Repeat to build the back panel.
- 3 Stand the front and back panels up. Attach the six 16.5-inch 1x6 side boards. Position them so they cover the 3/4-inch offset on the leg, making their end grain sit flush with the front and back boards. Drive 1-1/4-inch screws through the side boards directly into the narrow (1.5-inch) face of the legs.
- 4 Install the long bottom cleats by positioning the 27.5-inch 2x2s flat against the inside of the front and back walls, fitting snugly between the legs. Align their bottom edges flush with the lowest side board (3.5 inches up from the floor) and secure with 1-1/4-inch screws.
- 5 Install the short bottom cleats by positioning the 13.5-inch 2x2s against the inside of the side walls, between the legs. Make them flush with the long cleats to create a continuous inner ledge, securing them with screws.
- 6 Mark and cut notches in two of the 16.5-inch bottom slats so they fit around the corner posts. Using a jigsaw, cut a 3.5-inch wide by 1.5-inch deep rectangular notch into both the front and back corners of the left edge on one slat. Repeat mirroring cuts on the right edge of a second slat.
- 7 Drop the two notched slats into the far left and right sides of the planter, resting them on the cleats. Distribute the remaining four 16.5-inch slats evenly across the middle, leaving a rough 1/4-inch gap between each for drainage. Secure all slats to the cleats using 1-1/4-inch screws.
- 8 Cut the 1x4 top cap boards with a 45-degree miter on both ends. The long point measurement should be 37 inches for the front/back, and 19 inches for the sides.
- 9 Apply exterior waterproof wood glue to the top edge of the planter walls and legs. Place the mitered top cap pieces so they overhang the outside edges by exactly 1/2-inch all the way around. Secure with 1-1/4-inch brad nails or trim screws.
- 10 Line the inside of the box with permeable landscape fabric, using a staple gun to attach it just below the top cap. Finish the exterior cedar with a UV-protectant spar urethane or exterior teak oil to preserve its color.
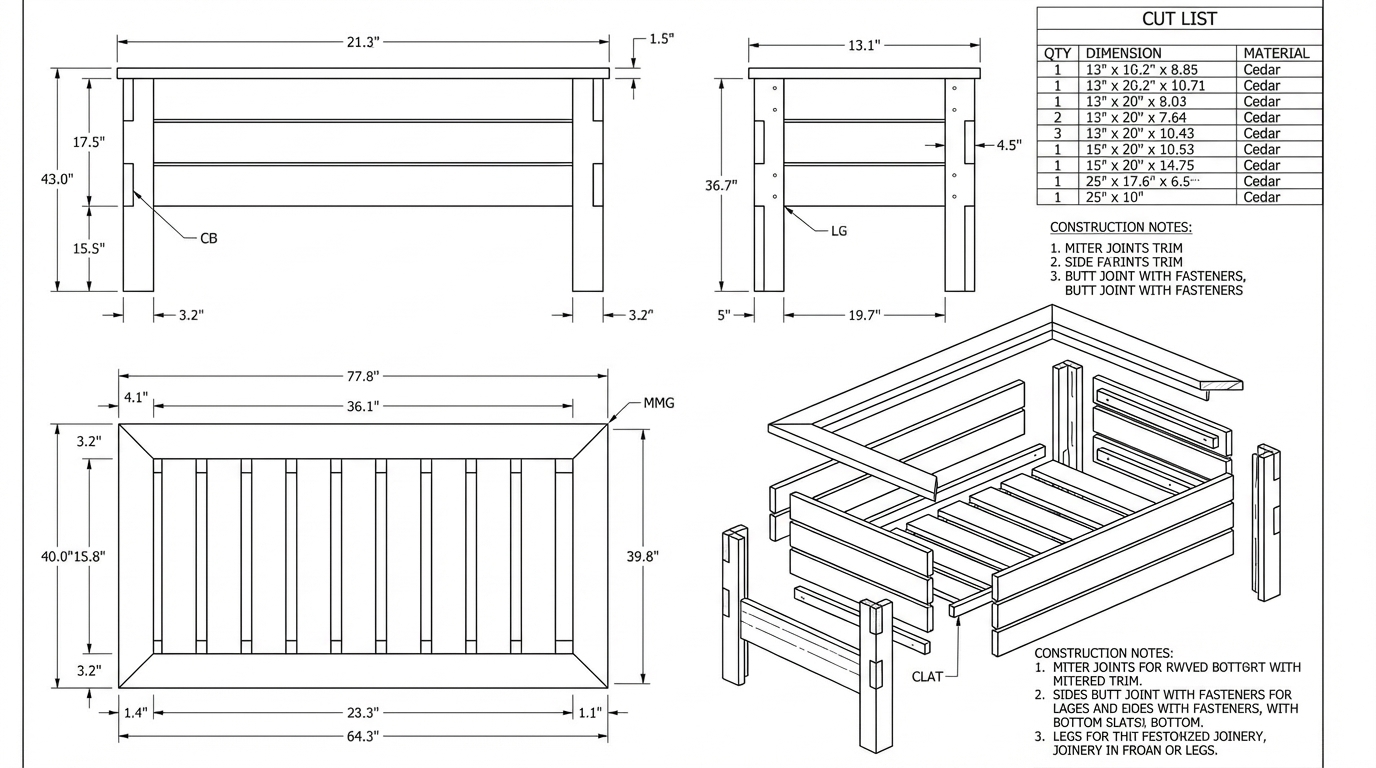
Cut List
| Piece | Dimensions | Qty | Source |
|---|---|---|---|
| Corner Legs | 1.5" x 3.5" x 20" | 4 | 2x4 Cedar |
| Front/Back Wall Boards | 0.75" x 5.5" x 36" | 6 | 1x6 Cedar |
| Side Wall Boards | 0.75" x 5.5" x 16.5" | 6 | 1x6 Cedar |
| Long Bottom Cleats | 1.5" x 1.5" x 27.5" | 2 | 2x2 Cedar |
| Short Bottom Cleats | 1.5" x 1.5" x 13.5" | 2 | 2x2 Cedar |
| Bottom Slats | 0.75" x 5.5" x 16.5" | 6 | 1x6 Cedar |
| Top Cap Front/Back | 0.75" x 3.5" x 37" | 2 | 1x4 Cedar (Cut 45 deg miters) |
| Top Cap Sides | 0.75" x 3.5" x 19" | 2 | 1x4 Cedar (Cut 45 deg miters) |
Tools Needed
📐 Assembly Drawing
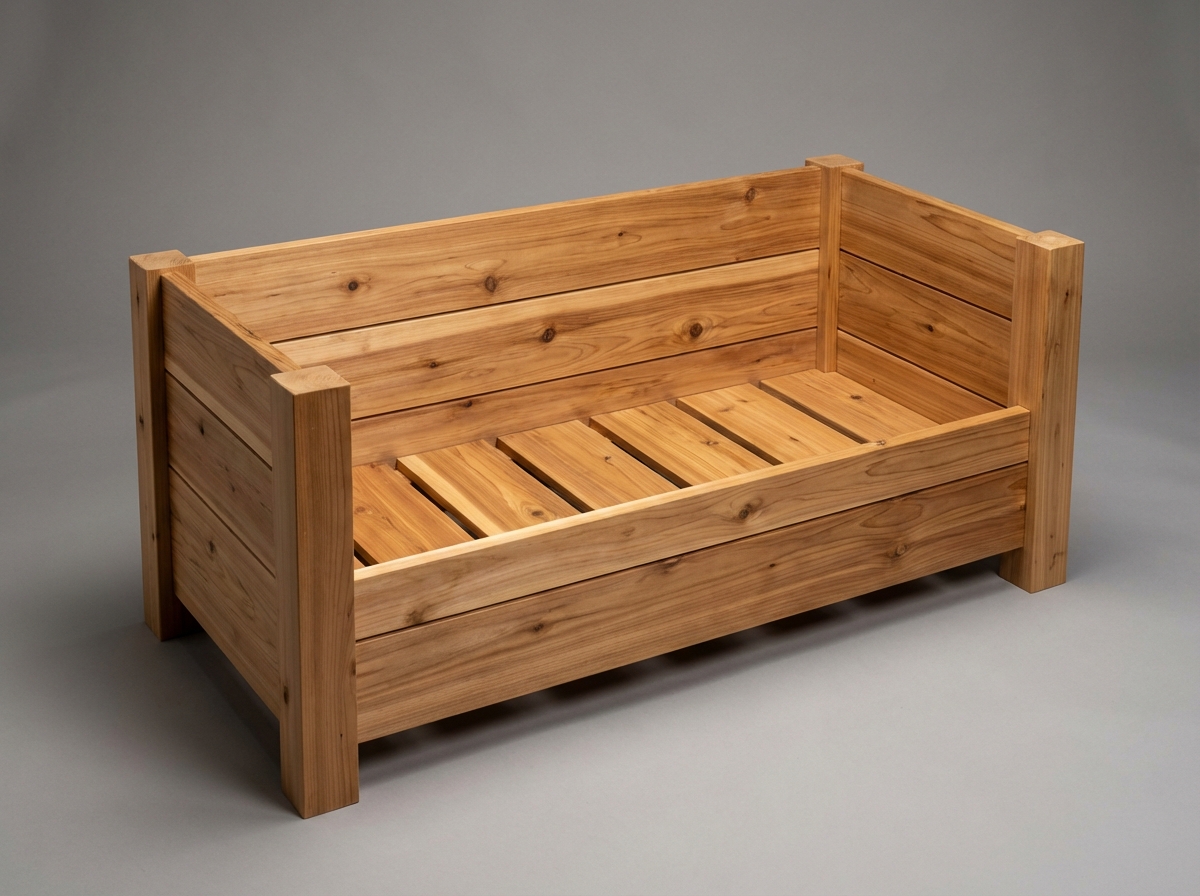
Classic Cedar Planter Box
A durable, beautiful outdoor planter built with simple pocket hole joinery and rot-resistant cedar.
ℹ️ AI-generated plan — images are illustrative. Cut list and steps are the primary reference.
Step-by-Step Plan
- 1 Cut all 2x2 corner posts and 1x6 cedar panels to length according to the cut list.
- 2 Drill three pocket holes on each inside end of the Front, Back, and Side panels, ensuring you set your jig for 3/4-inch material.
- 3 Assemble the front frame by laying two Corner Posts flat on your workbench. Position the three 33-inch Front Panels between them, leaving a 1.5-inch gap at the bottom to act as feet.
- 4 Align the Front Panels flush with the back (inside) edge of the posts—this will leave a beautiful 3/4-inch reveal on the front—and secure them using 1-1/4-inch exterior-grade pocket hole screws.
- 5 Repeat the exact same process from the previous two steps to build the back frame using the remaining two Corner Posts and three Back Panels.
- 6 Stand the assembled front and back frames upright. Connect them using the six 13-inch Side Panels, maintaining the 1.5-inch gap at the bottom and keeping the panels flush with the inside edges of the posts.
- 7 Secure the Side Panels into the Corner Posts using 1-1/4-inch exterior pocket hole screws to complete the outer box structure.
- 8 Flip the box upside down to install the floor supports. Attach the 33-inch 2x2 Floor Cleats flush with the bottom edge of the lowest Front and Back panels.
- 9 Drive 2-inch exterior screws through the cleats into the inner face of the panels to secure them firmly without the screws poking through the outside.
- 10 Flip the planter right-side up. Drop the five 12.5-inch Floor Slats onto the cleats, spacing them out evenly to leave roughly 1/2-inch gaps for soil drainage.
- 11 Secure the slats by driving 1-1/4-inch exterior screws through the top ends of each slat down into the cleats.
- 12 Sand any rough edges or splinters with 120-grit sandpaper. Line the inside with staple-in landscape fabric before adding soil, and either apply an outdoor oil finish or let the cedar weather naturally to a silvery gray.
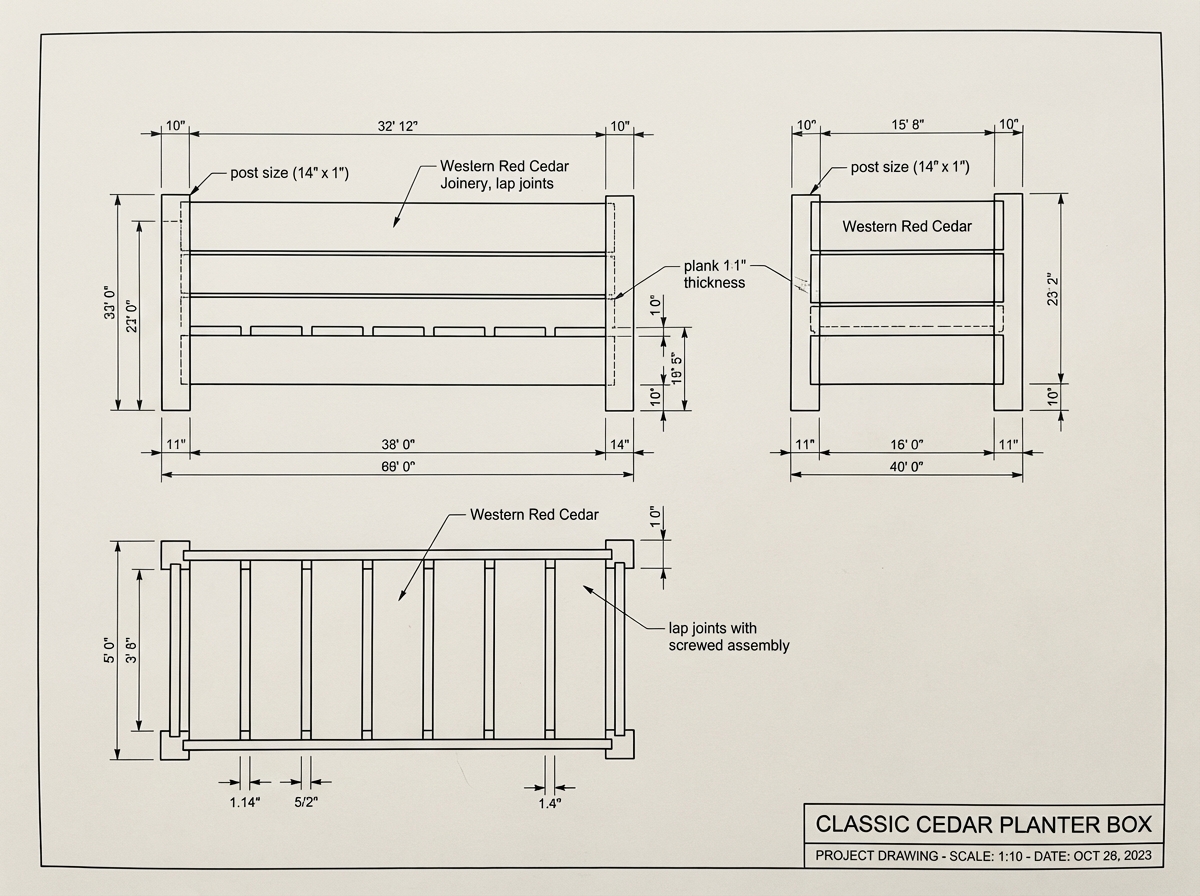
Cut List
| Piece | Dimensions | Qty | Source |
|---|---|---|---|
| Corner Posts | 1.5" x 1.5" x 18" | 4 | Cedar 2x2 |
| Front/Back Panels | 3/4" x 5.5" x 33" | 6 | Cedar 1x6 |
| Side Panels | 3/4" x 5.5" x 13" | 6 | Cedar 1x6 |
| Floor Cleats | 1.5" x 1.5" x 33" | 2 | Cedar 2x2 |
| Floor Slats | 3/4" x 5.5" x 12.5" | 5 | Cedar 1x6 |
Tools Needed
📐 Assembly Drawing
Classic Cedar Planter Box
A sturdy, weather-resistant garden box with a beautiful top trim ledge and built-in drainage.
ℹ️ AI-generated plan — images are illustrative. Cut list and steps are the primary reference.
Step-by-Step Plan
- 1 Cut all pieces to size according to the Cut List using a miter saw. Use exterior-grade cedar, as it naturally resists rot and insects.
- 2 Build the two Side Panels. Lay three Side Wall boards (16.5" 1x6) flat on your workbench. Place two Corner Posts (16.5" 2x2) on top of them, aligning the posts flush with the left and right ends of the boards.
- 3 Secure the Side Wall boards to the Corner Posts using 1-1/4" exterior wood screws. Drive the screws from the outside face of the 1x6s into the 2x2 posts, using two screws per board end.
- 4 Attach the Cleats to prepare for the floor. Take the lowest Front Wall board and lowest Back Wall board. Center a Cleat (43.5" 2x2) along the bottom inside edge of each. There should be exactly a 2.25" gap on both ends of the cleat.
- 5 Secure the Cleats by driving 1-1/4" screws through the outside face of the 1x6 Front/Back wall boards into the 2x2 cleats.
- 6 Assemble the main box frame. Stand the two side panels upright. Attach the Front and Back Wall boards across them, making sure the boards with the attached Cleats are at the very bottom, with cleats facing inward.
- 7 Drive 1-1/4" screws through the Front and Back Wall boards directly into the Corner Posts. The Front/Back boards will overlap and hide the end-grain of the Side Wall boards.
- 8 Install the Floor Slats. Drop the ten Floor Slats (16.25" 1x4) into the bottom of the box so they rest on the front and back Cleats. Space them evenly with roughly a 3/4" gap between each for water drainage.
- 9 Secure the Floor Slats to the Cleats using two 1-1/4" exterior screws per slat end.
- 10 Attach the Front and Back Top Trims (50" 1x4). Lay them flat across the top edge of the box, centering them so they overhang the left and right sides by 1", and the front/back by 1". Secure with 1-1/4" exterior trim screws driven down into the wall edges and corner posts.
- 11 Attach the Side Top Trims (13" 1x4). Place them between the Front and Back trims, aligning the outer edge to match the 1" overhang. Secure downward into the side walls with 1-1/4" trim screws.
- 12 Sand any rough edges, especially around the top trim. Staple landscaping fabric to the inside walls just below the top trim to hold the soil in while allowing excess water to drain through the floor slats.
Cut List
| Piece | Dimensions | Qty | Source |
|---|---|---|---|
| Front/Back Walls | 3/4" x 5.5" x 48" | 6 | 1x6 Cedar Board |
| Side Walls | 3/4" x 5.5" x 16.5" | 6 | 1x6 Cedar Board |
| Corner Posts | 1.5" x 1.5" x 16.5" | 4 | 2x2 Cedar Baluster |
| Cleats | 1.5" x 1.5" x 43.5" | 2 | 2x2 Cedar Baluster |
| Floor Slats | 3/4" x 3.5" x 16.25" | 10 | 1x4 Cedar Board |
| Front/Back Top Trim | 3/4" x 3.5" x 50" | 2 | 1x4 Cedar Board |
| Side Top Trim | 3/4" x 3.5" x 13" | 2 | 1x4 Cedar Board |
Tools Needed
📐 Assembly Drawing
Written by
Sawinery's Team
Sawinery is your ultimate destination for all things woodworking — your trusted hub for expert advice, practical guides, and in-depth recommendations. Discover answers to your woodworking questions, along with curated tips on tools, projects, books, videos, DIYs, and hands-on techniques to elevate your craft.
