Miter Saw Station Plans
Intermediate
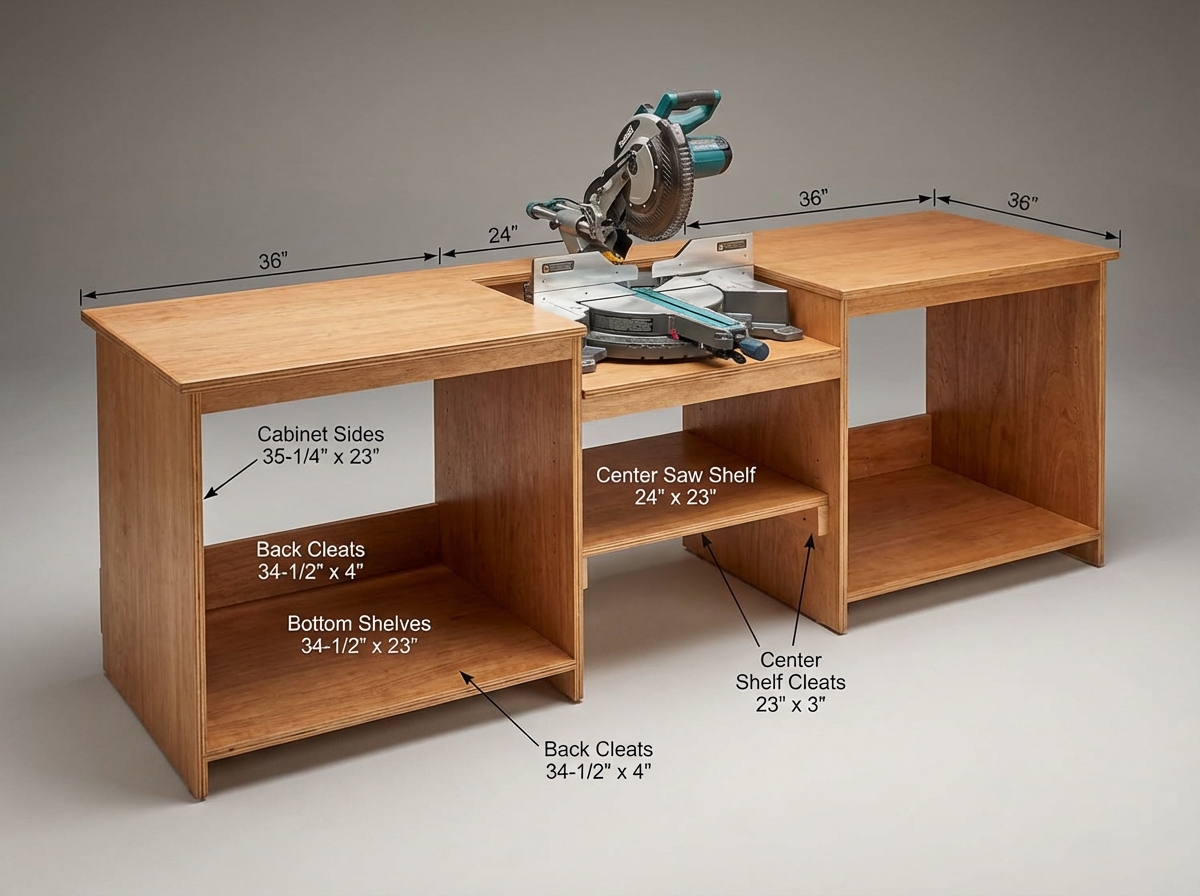
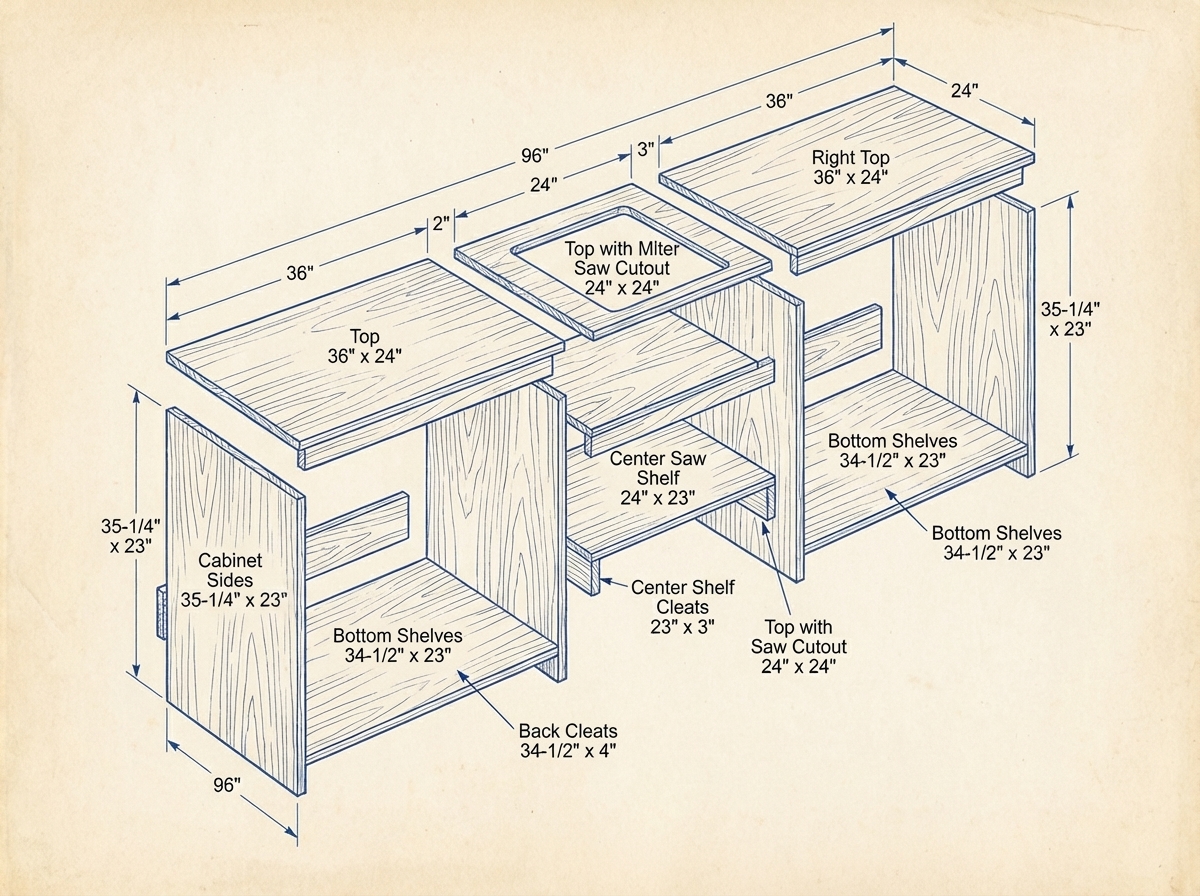
Pro-Style Modular Miter Saw Station
An 8-foot powerhouse with wing support and integrated storage capability.
Step-by-Step Plan
- 1 Cut all 3/4-inch plywood parts according to the Cut List using a table saw or track saw. Label the Cabinet Sides, Bottom Shelves, and Top Stretchers to keep components organized.
- 2 Drill pocket holes spaced every 6 inches along the left and right underside edges of the Bottom Shelves. Drill additional pocket holes on the inside faces of the Top Stretchers and Back Cleats.
- 3 Mark a horizontal layout line 3-1/2 inches up from the bottom edge on the inside face of each Left Cabinet Side. Align the Bottom Shelf to this line and secure with wood glue and 1-1/4-inch pocket screws.
- 4 Attach the Top Stretchers flush with the top edge of the sides, placing one flush at the front and one flush at the back. Secure the Back Cleat horizontally just above the bottom shelf using glue and 1-1/4-inch pocket screws.
- 5 Repeat the exact same assembly process from steps 3 and 4 to build the identical Right Cabinet.
- 6 Measure the base height of your specific miter saw (standard is typically 3-1/2 inches). Mark a line below the top edge on the right exterior of the left cabinet and left exterior of the right cabinet equal to this measurement.
- 7 Attach the Center Shelf Cleats firmly just below your marked lines using generous wood glue and 1-1/4-inch wood screws. Drive the screws from the inside of the cabinets outward into the cleats.
- 8 Position the two assembled cabinets exactly 24 inches apart. Drop the Center Saw Shelf onto the cleats and secure it with 1-1/4-inch screws driven downward into the cleats to permanently bridge the station together.
- 9 Center the Left and Right Tops over their respective cabinets, leaving a 1-inch overhang at the front and keeping them flush at the back. Drive 1-1/4-inch screws vertically up through the Top Stretchers into the underside of the Tops.
- 10 Sand the entire station with 120-grit, followed by 180-grit sandpaper, smoothing over all exposed plywood edges. Finish the work surfaces with two to three coats of protective polyurethane to resist shop wear and tear.
Cut List
| Piece | Dimensions | Qty | Source |
|---|---|---|---|
| Cabinet Sides | 35-1/4" x 23" | 4 | 3/4" Plywood |
| Cabinet Tops | 36" x 24" | 2 | 3/4" Plywood |
| Bottom Shelves | 34-1/2" x 23" | 2 | 3/4" Plywood |
| Top Stretchers | 34-1/2" x 4" | 4 | 3/4" Plywood |
| Back Cleats | 34-1/2" x 4" | 2 | 3/4" Plywood |
| Center Saw Shelf | 24" x 23" | 1 | 3/4" Plywood |
| Center Shelf Cleats | 23" x 3" | 2 | 3/4" Plywood |
Tools Needed
Table saw or Track sawMiter sawPower drillPocket hole jigRandom orbital sanderTape measureClampsCarpenter's square
📐 Assembly Drawing
2
Beginner
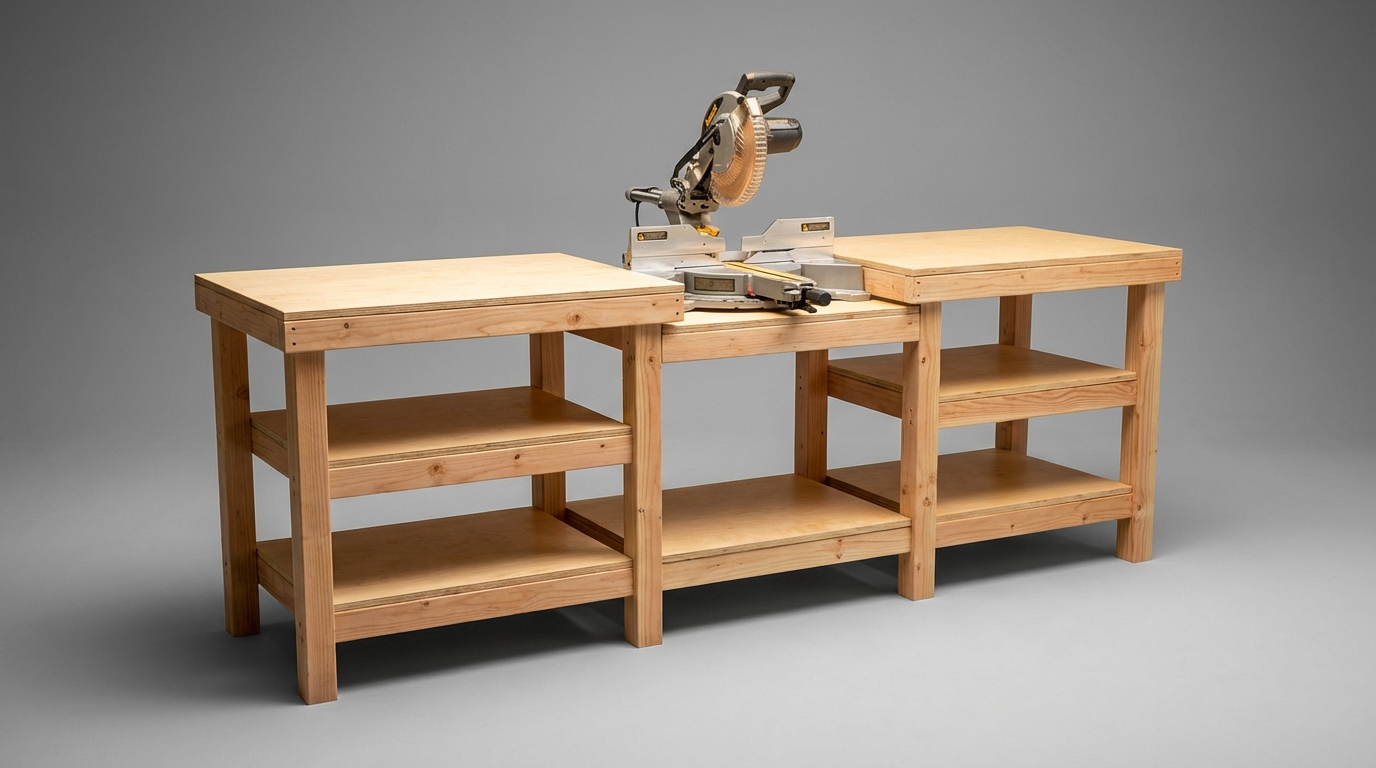
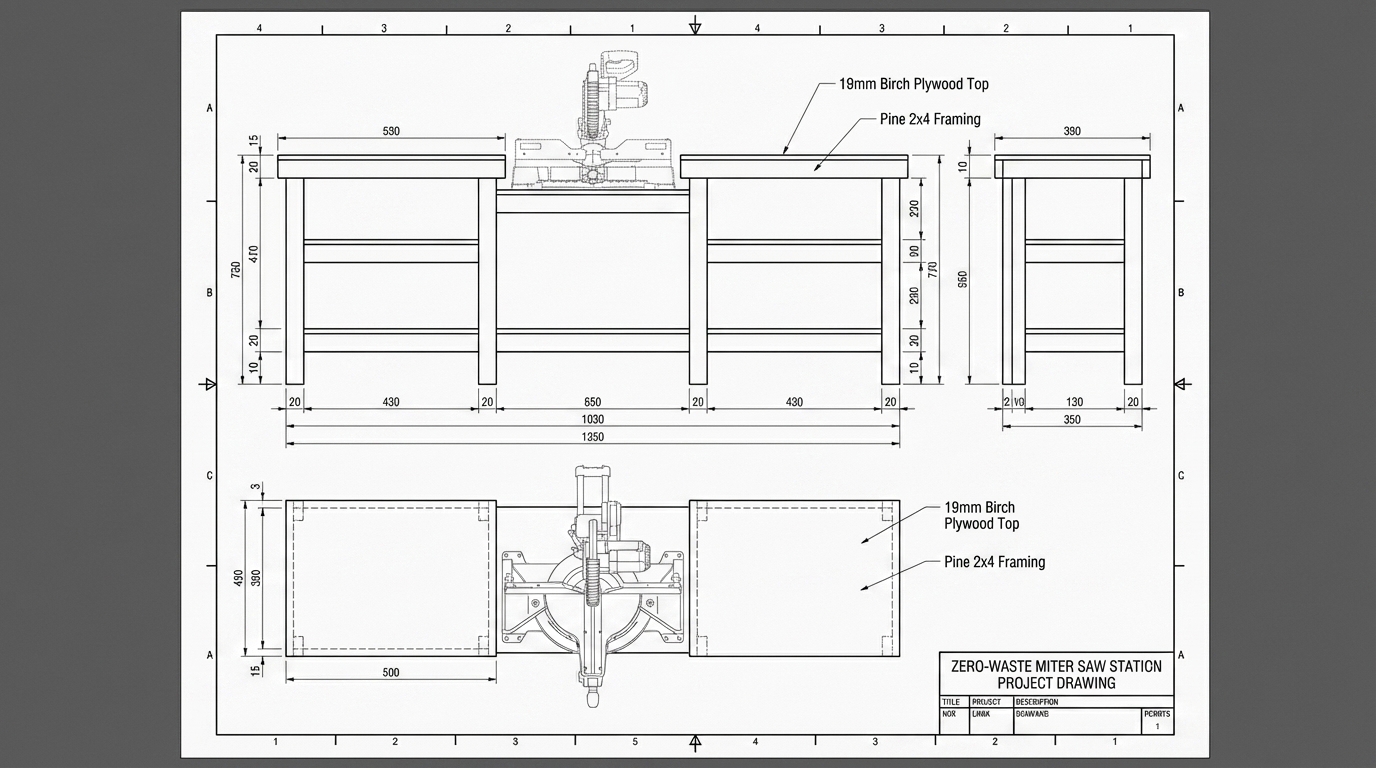
Zero-Waste Miter Saw Station
A rock-solid, 8-foot workbench with a perfectly flush drop-deck, built from standard 2x4s and a single sheet of plywood.
Step-by-Step Plan
- 1 Cut the 2x4 framing materials according to the cut list. Make sure all cuts are perfectly square at 90 degrees to ensure a flat workbench.
- 2 Assemble four 36-inch by 24-inch rectangular frames for the Left and Right Modules. For each frame, lay two 36-inch Front/Back Rails flat and attach two 21-inch Side Rails and one 21-inch Center Strut between them using wood glue and 2.5-inch construction screws.
- 3 Build the Left Module by attaching four 35.25-inch Legs to the inside corners of one top frame and one bottom frame. Position the top frame perfectly flush with the top of the legs, and mount the bottom frame 3 inches from the floor.
- 4 Build the Right Module by repeating the previous step. You now have two identical 36-inch wide independent workbenches. Position them roughly 24 inches apart.
- 5 Install the Lower Center Bridge to connect the modules. Screw two 24-inch Bridge Ledgers to the lower inside faces of the Left and Right modules flush with their bottom frames, then secure two 21-inch Bridge Cross Rails between the ledgers.
- 6 Attach the Upper Center Bridge to create the saw drop. Mount the two remaining 24-inch Bridge Ledgers directly underneath the upper frames of the Left and Right modules. Because a 2x4 is 3.5 inches wide, this automatically drops the center deck by exactly 3.5 inches without any measuring!
- 7 Secure two 21-inch Bridge Cross Rails between the upper ledgers to complete the 24x24 inch center platform frame.
- 8 Rip your 48x96-inch plywood sheet down the middle to create two 24x96-inch strips. Crosscut both strips into pieces of 36 inches, 36 inches, and 24 inches.
- 9 Notch the four corners of the two 36-inch lower shelf panels. Using a jigsaw, cut a 3.5-inch by 1.5-inch rectangle out of each corner so the plywood can bypass the legs and rest cleanly on the lower 2x4 frames.
- 10 Drop the notched panels into the lower sections of the left and right modules, and the 24-inch square panel into the lower center bridge. Secure them with 1.25-inch screws.
- 11 Attach the two 36-inch wing tops and the 24-inch center drop top to the upper frames using 1.25-inch screws. Countersink the screws slightly so they sit below the surface.
- 12 Place your miter saw on the center drop deck. Check with a long straight edge to ensure the saw bed is flush with the wing panels; add thin cardboard or veneer shims under the saw base if your specific model needs a slight boost.
Cut List
| Piece | Dimensions | Qty | Source |
|---|---|---|---|
| Module Front/Back Rails | 1.5" x 3.5" x 36" | 8 | 2x4 Lumber |
| Module Side Rails & Center Struts | 1.5" x 3.5" x 21" | 12 | 2x4 Lumber |
| Vertical Legs | 1.5" x 3.5" x 35.25" | 8 | 2x4 Lumber |
| Bridge Ledgers | 1.5" x 3.5" x 24" | 4 | 2x4 Lumber |
| Bridge Cross Rails | 1.5" x 3.5" x 21" | 4 | 2x4 Lumber |
| Wing Tops & Lower Shelves | 3/4" x 24" x 36" | 4 | 3/4" Plywood |
| Center Drop Deck & Lower Shelf | 3/4" x 24" x 24" | 2 | 3/4" Plywood |
Tools Needed
Miter Saw or Circular SawDrill/DriverJigsaw (for shelf notches)Tape MeasureSpeed SquareClamps2.5-inch Construction Screws1.25-inch Wood Screws
📐 Assembly Drawing
Written by
Sawinery's Team
Sawinery is your ultimate destination for all things woodworking — your trusted hub for expert advice, practical guides, and in-depth recommendations. Discover answers to your woodworking questions, along with curated tips on tools, projects, books, videos, DIYs, and hands-on techniques to elevate your craft.
