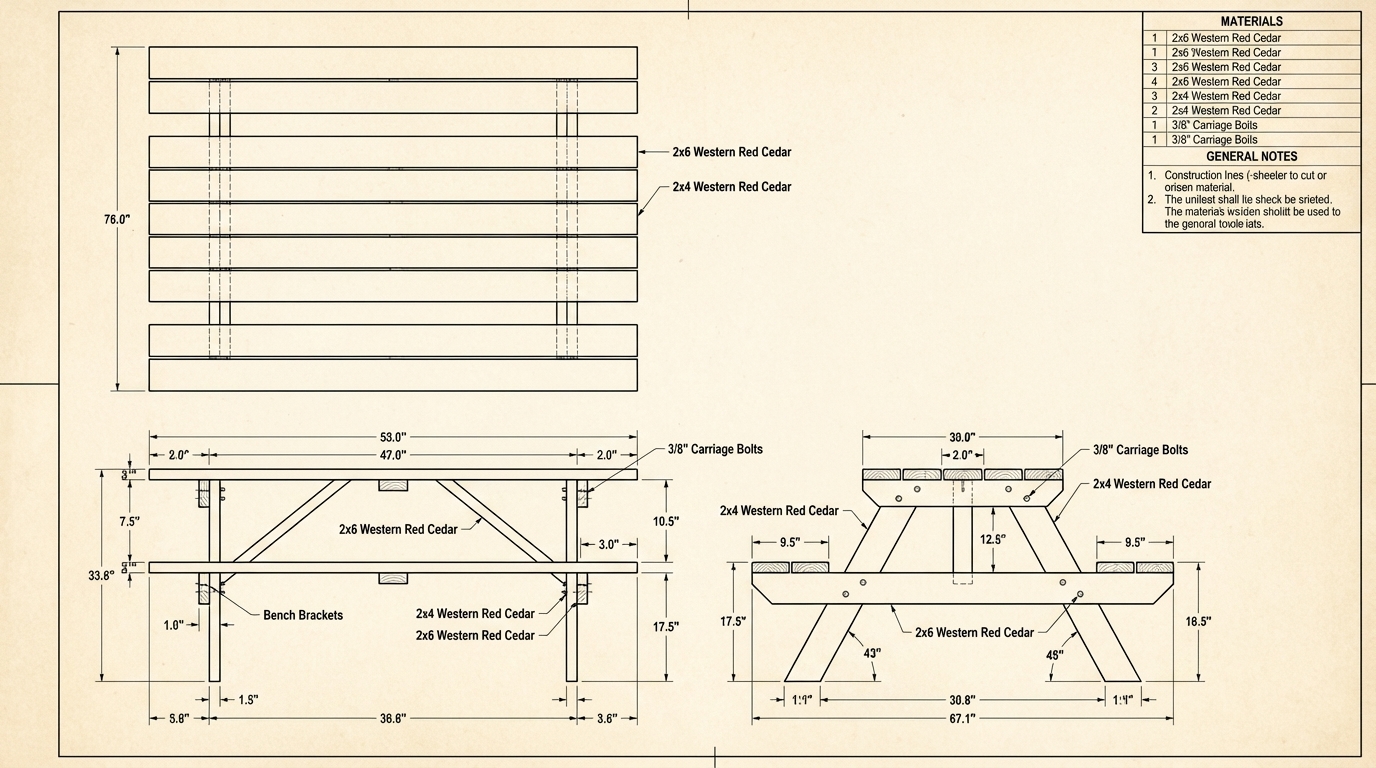
Picnic Table Wood Plans
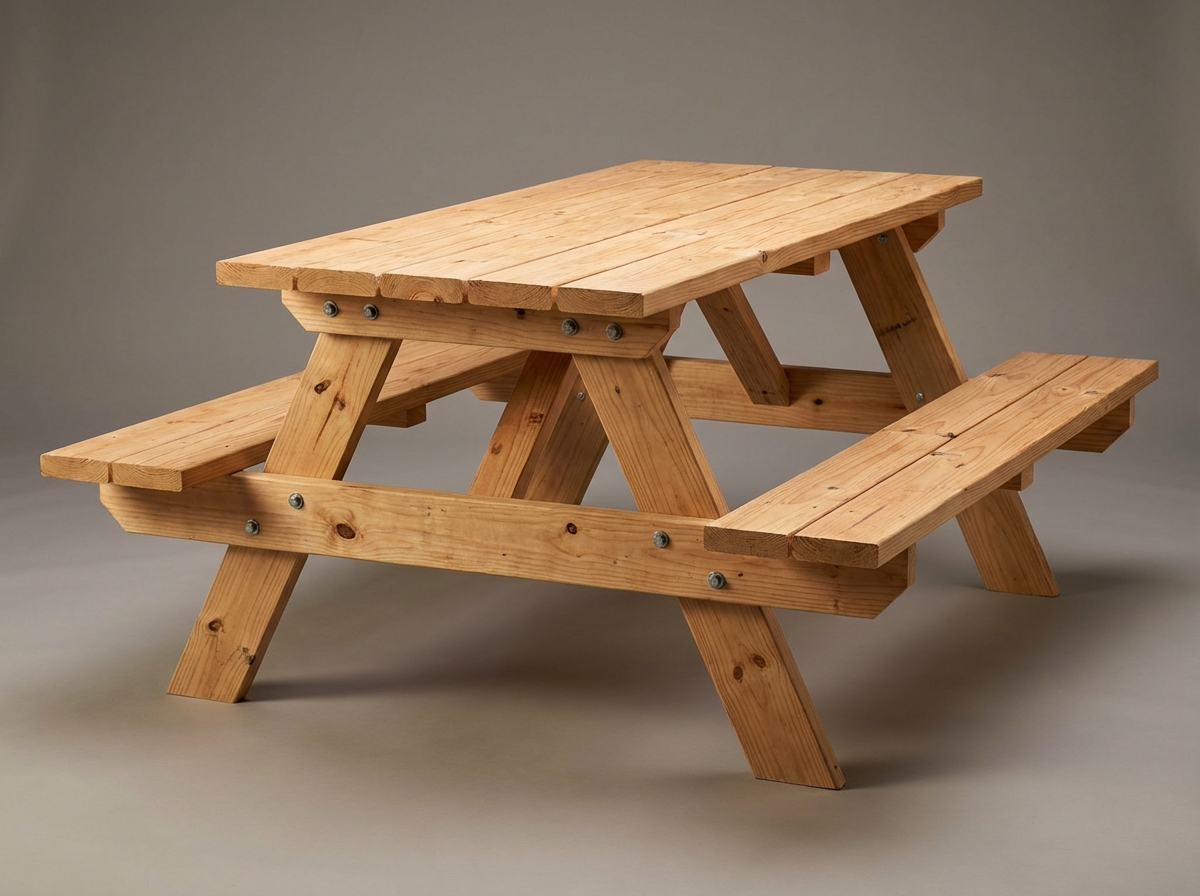
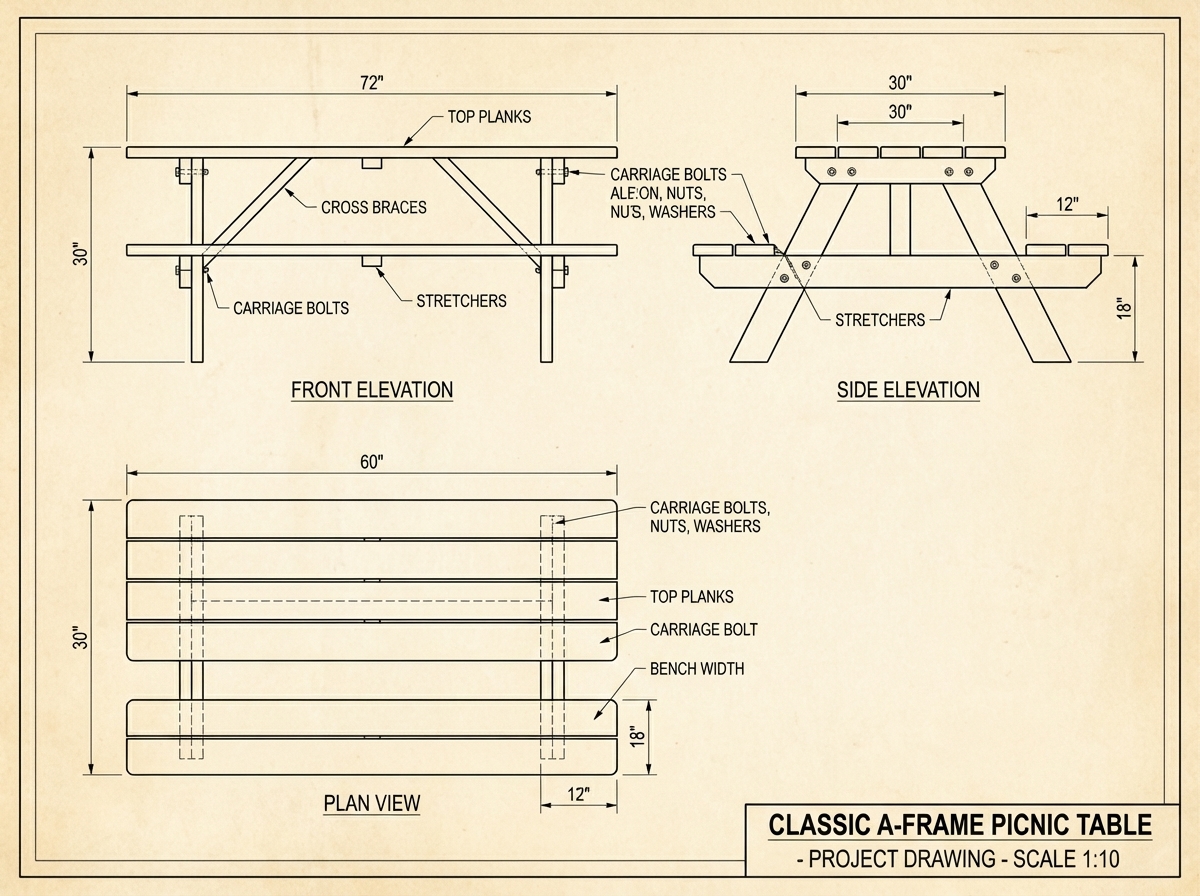
Classic A-Frame Picnic Table
A heavy-duty, backyard staple built to last for generations.
ℹ️ AI-generated plan — images are illustrative. Cut list and steps are the primary reference.
Step-by-Step Plan
- 1 Cut all five Tabletop Boards and four Seat Boards to exactly 72 inches in length.
- 2 Cut the four Leg pieces to 33 inches long with 30-degree parallel angles on both ends (creating a parallelogram). The ends should sit flat on the floor when stood up.
- 3 Trim the two Seat Supports to 60 inches and the three Tabletop Supports to 29.5 inches. Cut 45-degree dog-ears on the bottom corners of these supports to prevent sharp edges.
- 4 Lay the five Tabletop Boards upside down on a flat surface, placing 1/2-inch spacers between them to ensure even drainage gaps. Total width should be 29.5 inches.
- 5 Attach the three Tabletop Supports flat across the tabletop boards using 2-1/2 inch exterior deck screws. Inset the two outer supports 12 inches from the ends, and place the third support dead center.
- 6 Position the Legs against the inside faces of the outer Tabletop Supports. Drill two 3/8-inch holes through each leg/support joint and secure them tightly using 3-1/2 inch carriage bolts, washers, and nuts.
- 7 Measure 15 inches up from the bottom of each leg and mark a line. Clamp the 60-inch Seat Supports horizontally across the outside of the legs at this line, drill 3/8-inch holes, and bolt them together.
- 8 Cut the Diagonal Braces to roughly 28 inches with opposing 45-degree angles on the ends. Attach them with 2-1/2 inch screws between the center Tabletop Support and the center of each Seat Support to prevent racking.
- 9 Flip the entire table upright using two people. It should now stand freely on its A-frame legs.
- 10 Position the four Seat Boards on top of the Seat Supports (two per side), leaving a 1/2-inch gap between boards and ensuring equal overhang on the ends. Secure with 2-1/2 inch deck screws driven straight down.
- 11 Sand all exposed faces, edges, and corners with 80-grit followed by 120-grit sandpaper to remove any splinters or mill glaze.
- 12 Apply two coats of exterior semi-transparent deck stain or waterproofer to protect the wood from the elements.
Cut List
| Piece | Dimensions | Qty | Source |
|---|---|---|---|
| Tabletop Boards | 1.5" x 5.5" x 72" | 5 | 2x6 lumber |
| Seat Boards | 1.5" x 5.5" x 72" | 4 | 2x6 lumber |
| Legs | 1.5" x 5.5" x 33" (30-degree parallel ends) | 4 | 2x6 lumber |
| Seat Supports | 1.5" x 5.5" x 60" | 2 | 2x6 lumber |
| Tabletop Supports | 1.5" x 3.5" x 29.5" | 3 | 2x4 lumber |
| Diagonal Braces | 1.5" x 3.5" x 28" (45-degree opposing ends) | 2 | 2x4 lumber |
Tools Needed
📐 Assembly Drawing

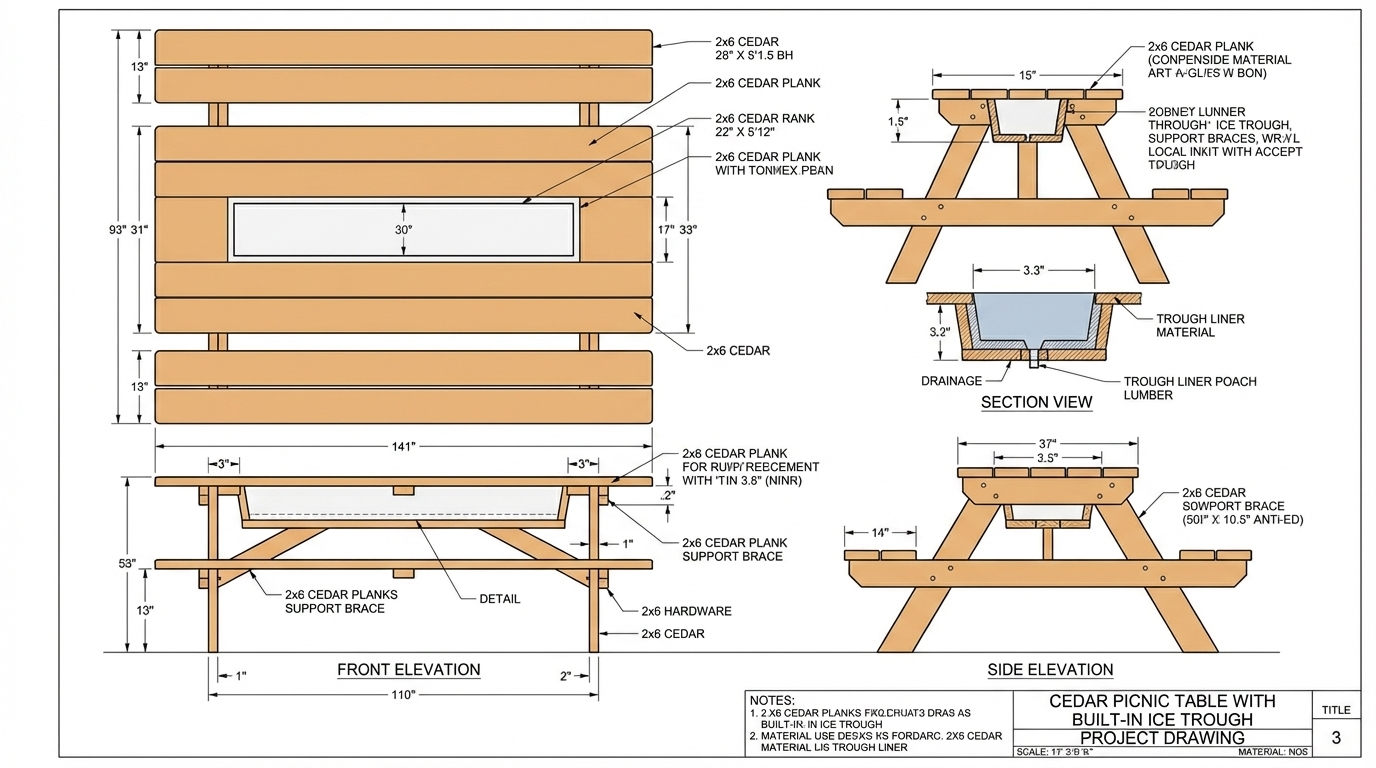
Cedar Picnic Table with Built-In Ice Trough
A stunning classic A-frame picnic table featuring a hidden center cooler to keep drinks icy cold all summer long.
ℹ️ AI-generated plan — images are illustrative. Cut list and steps are the primary reference.
Step-by-Step Plan
- 1 Cut all components to length according to the cut list. For the four 31-1/2in Legs, cut 25-degree parallel bevels on both ends. For the two 24in Diagonal Braces, cut 45-degree parallel bevels on both ends.
- 2 Lay the tabletop boards upside down on a flat surface. Order from left to right: two 72in 2x8s, the two 12in 2x6s (spaced 48in apart in the center), and the final two 72in 2x8s. Insert 1/4in spacers between all long edges to allow for water drainage and wood expansion.
- 3 Mark 8 inches in from both ends of the tabletop. Place the 33in 2x4 Tabletop Cleats across the boards at these marks. Secure the cleats to every board using 2-1/2in exterior screws driven through the cleat and into the top boards. Avoid the 48in center gap.
- 4 Attach the Legs to the inside faces of the Tabletop Cleats. The top angled edge of each leg should sit flush against the underside of the tabletop. Fasten each leg to the cleat using two 2-1/2in exterior screws.
- 5 Measure 16-1/2 inches from the bottom of the legs (this will be the top edge of your seat support). Clamp the 60in 2x6 Seat Supports across the outside faces of the legs. Drill two 3/8in holes through each leg/support intersection and secure them tightly with 3in carriage bolts, washers, and nuts.
- 6 Build the Cooler Trough Box. Place the two 48in 2x4 Sides and two 4-1/4in 2x4 Ends ON TOP of the 48in 1x8 Bottom board to form a rectangle. Secure the sides and ends by driving 2in exterior screws UP through the bottom of the 1x8 into the 1.5in edges of the 2x4s. Fasten the corners together with 2-1/2in screws.
- 7 Flip the entire table upright. Slide the assembled Trough Box up into the 48in center gap from underneath. The box is wider than the gap and will overlap the bottom of the 2x8s. Secure it by driving 2-1/2in exterior screws through the wide face of the trough's 2x4 sides UP into the bottom of the 2x8 tabletop planks.
- 8 Position the four 72in 2x6 Seat planks on top of the Seat Supports, using two planks per side with a 1/4in gap between them. Leave a 6in overhang on the ends. Secure them by driving 2-1/2in screws from underneath the Seat Supports up into the Seat planks to keep fastener heads hidden.
- 9 Install the two 24in Diagonal Braces. Run each brace from the center of the Seat Support crossmember angling up to the underside of the Tabletop, securing them with 2-1/2in screws. Drill two 1/2in holes in the bottom of the trough for water drainage, then seal the inside seams of the trough with exterior-grade silicone caulk.
- 10 Sand all surfaces with 120-grit sandpaper, paying special attention to the seat edges and tabletop corners. Apply two coats of exterior penetrating oil or waterproof sealant to protect the wood from the elements.
Cut List
| Piece | Dimensions | Qty | Source |
|---|---|---|---|
| Tabletop Planks | 1-1/2in x 7-1/4in x 72in | 4 | 2x8x8' Cedar or Pressure Treated |
| Tabletop Center Ends | 1-1/2in x 5-1/2in x 12in | 2 | 2x6x8' Cedar or Pressure Treated |
| Seats | 1-1/2in x 5-1/2in x 72in | 4 | 2x6x8' Cedar or Pressure Treated |
| Legs | 1-1/2in x 5-1/2in x 31-1/2in (25-degree parallel bevels) | 4 | 2x6x8' Cedar or Pressure Treated |
| Seat Supports | 1-1/2in x 5-1/2in x 60in | 2 | 2x6x8' Cedar or Pressure Treated |
| Tabletop Cleats | 1-1/2in x 3-1/2in x 33in | 2 | 2x4x8' Cedar or Pressure Treated |
| Diagonal Braces | 1-1/2in x 3-1/2in x 24in (45-degree parallel bevels) | 2 | 2x4x8' Cedar or Pressure Treated |
| Trough Bottom | 3/4in x 7-1/4in x 48in | 1 | 1x8x6' Cedar |
| Trough Sides | 1-1/2in x 3-1/2in x 48in | 2 | 2x4x8' Cedar |
| Trough Ends | 1-1/2in x 3-1/2in x 4-1/4in | 2 | 2x4x8' Cedar |
Tools Needed
📐 Assembly Drawing
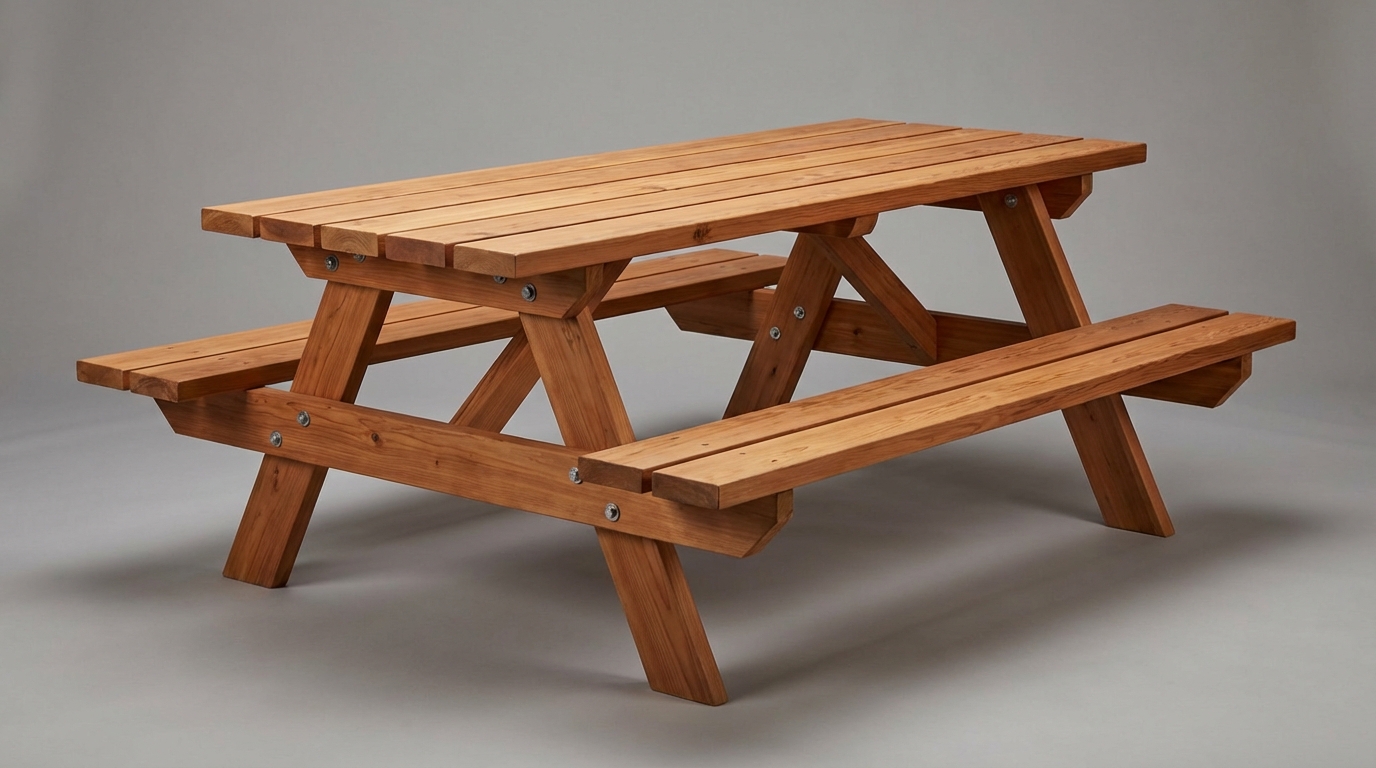
Classic Cedar A-Frame Picnic Table
A beautiful, sturdy, hidden-fastener outdoor classic built to last generations.
ℹ️ AI-generated plan — images are illustrative. Cut list and steps are the primary reference.
Step-by-Step Plan
- 1 Cut the five Tabletop Boards and four Seat Boards to exactly 72 inches. Cut the three Table Supports to 28.5 inches, and the two Seat Supports to 60 inches.
- 2 Miter the four Legs to 32 inches long, cutting parallel 30-degree angles (60-degree on your saw's scale) on both ends so they form a parallelogram. Cut the two Diagonal Braces to 28 inches with 45-degree angled ends.
- 3 Lay the five Tabletop Boards face-down on a flat, non-marring surface. Insert 1/4-inch spacers between each board to ensure even drainage gaps.
- 4 Position the three Table Supports flat across the tabletop boards. Place one exactly in the center, and the other two 12 inches in from each end.
- 5 Drive 2.5-inch exterior decking screws through the Table Supports UP into the Tabletop Boards. By screwing from underneath, you guarantee a perfectly smooth, beautiful tabletop with no visible hardware. Use two screws per board per support.
- 6 Attach the Legs. Position each leg flat against the inside face of the outer Table Supports. Drill two 3/8-inch holes through the overlapping joint, then secure with 3.5-inch carriage bolts, washers, and nuts. Tighten firmly with a socket wrench.
- 7 Mark a line horizontally across the legs 15.5 inches up from the bottom (floor). Attach the 60-inch Seat Supports across the OUTSIDE face of the legs at this line. Check that they are level, then drill and bolt them in place just like the upper legs.
- 8 Install the Diagonal Braces. Position them extending from the Center Table Support down to the center point of each Seat Support. Secure them using 2.5-inch exterior screws driven at an angle.
- 9 Recruit a helper and flip the heavy table assembly upright onto its legs.
- 10 Position the Seat Boards on top of the extending Seat Supports, leaving a 1/4-inch gap between the two boards on each side. Secure them by driving 2.5-inch screws through the Seat Boards down into the supports.
- 11 Sand all surfaces starting with 80-grit, progressing to 120-grit. Pay special attention to easing the hard edges of the seats and tabletop to prevent splinters.
- 12 Apply two coats of exterior UV-protectant penetrating oil or cedar sealer to preserve the natural color and protect the wood from the elements.
Cut List
| Piece | Dimensions | Qty | Source |
|---|---|---|---|
| Tabletop Boards | 1.5" x 5.5" x 72" | 5 | 2x6 Cedar |
| Seat Boards | 1.5" x 5.5" x 72" | 4 | 2x6 Cedar |
| Seat Supports | 1.5" x 5.5" x 60" | 2 | 2x6 Cedar |
| Legs | 1.5" x 5.5" x 32" | 4 | 2x6 Cedar |
| Table Supports | 1.5" x 3.5" x 28.5" | 3 | 2x4 Cedar |
| Diagonal Braces | 1.5" x 3.5" x 28" | 2 | 2x4 Cedar |
Tools Needed
📐 Assembly Drawing
Written by
Sawinery's Team
Sawinery is your ultimate destination for all things woodworking — your trusted hub for expert advice, practical guides, and in-depth recommendations. Discover answers to your woodworking questions, along with curated tips on tools, projects, books, videos, DIYs, and hands-on techniques to elevate your craft.
