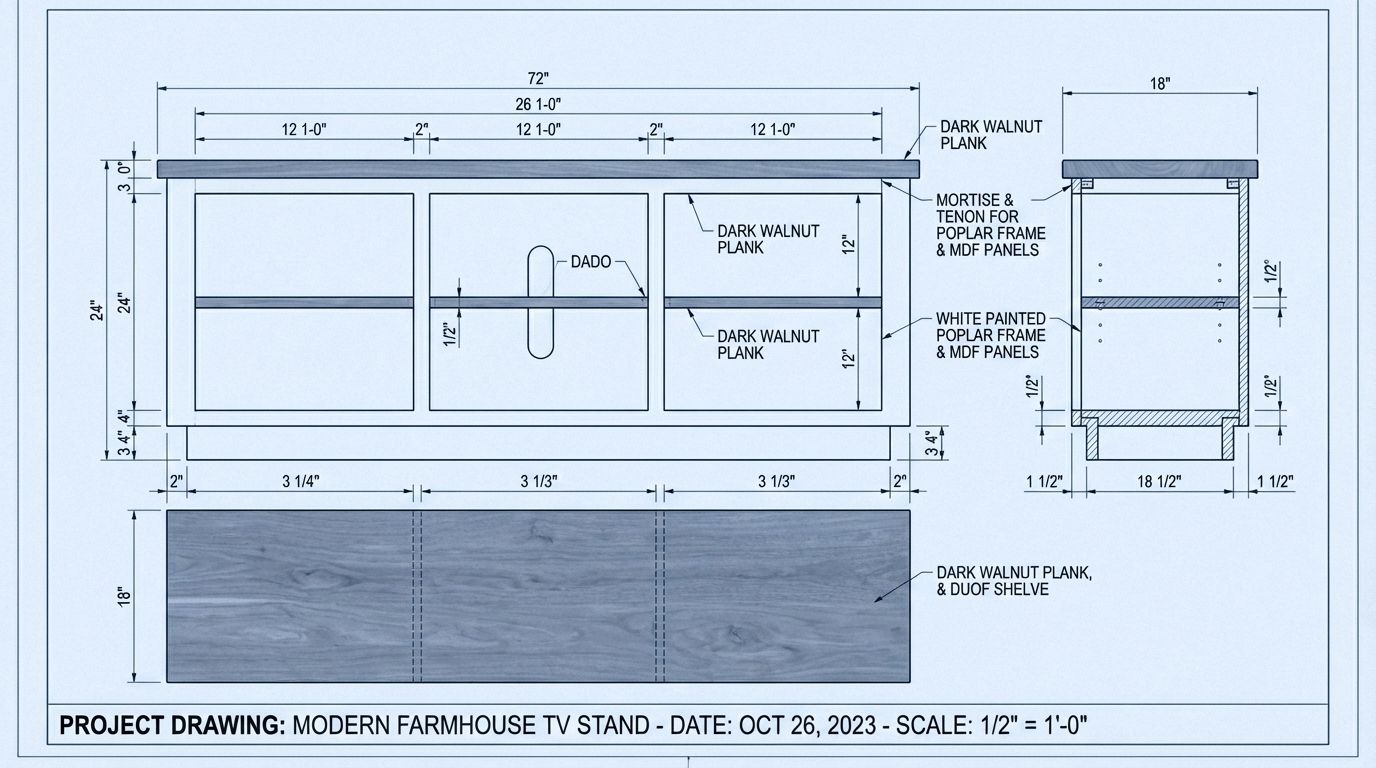
TV Stand DIY Wood Plans
undefined
1

Intermediate
Modern Farmhouse TV Stand
A clean, sturdy media console built from standard plywood and trim.
Step-by-Step Plan
- 1 Cut all plywood and base components according to the cut list. Apply iron-on edge banding to the front-facing edges of the Bottom Panel, Side Panels, Dividers, and Shelves to hide the exposed plywood layers, trimming the excess with an edge banding trimmer.
- 2 Build the base frame. Drill two pocket holes on each end of the Base Sides. Place them between the Base Front and Base Back, flush at the top and bottom. Apply wood glue and secure with 1-1/4in pocket screws to form a 54in x 12.5in rectangle.
- 3 Attach the base to the Bottom Panel. Lay the Bottom Panel upside down and center the base frame on it (leaving a 2in margin on the left/right and a 1.25in margin front/back). Pre-drill and drive 1-1/4in wood screws through the inside of the base directly into the bottom panel.
- 4 Flip the base assembly right-side up. Draw light pencil layout lines on the top face of the Bottom Panel to position the uprights. The Side Panels align completely flush with the left and right ends. The Dividers sit exactly 17.5in inward from each Side Panel.
- 5 Secure the Side Panels and Dividers. Because the base is recessed, you can access the underside of the Bottom Panel. Apply wood glue to the bottom edges of the uprights, clamp them to your layout lines, and drive 1-1/4in wood screws directly upward from underneath the Bottom Panel.
- 6 Drill pocket holes on the ends of the Top Stretchers. Install them horizontally between the Side Panels at the very top—one flush with the front edge, one flush with the back edge. Secure with 1-1/4in pocket screws.
- 7 Lock the top of the Dividers in place. Pre-drill through the top of the Top Stretchers and drive 1-1/4in wood screws straight down into the top edges of the two Dividers, checking with a framing square to ensure they are perfectly vertical.
- 8 Install the shelves. Drill pocket holes on the undersides of the Side Shelves and Center Shelf. Position them at your desired height in each bay, making sure they sit flush against the back but 1/4in back from the front edge for depth. Secure with 1-1/4in pocket screws.
- 9 Attach the Back Panel to square the cabinet. Apply a thin bead of wood glue along the back edges of the Bottom Panel, Side Panels, and Dividers. Nail the 1/4in Back Panel perfectly flush to the edges using 1in brad nails.
- 10 Mount the Top Panel. Center the edge-glued pine Top Panel over the carcass so it overhangs 1in on the left and right, and 1/2in on the front and back. Secure it by driving 1-1/4in wood screws upward through the Top Stretchers into the underside of the Top Panel.
- 11 Sand the entire assembly with 120-grit, then 220-grit sandpaper. Apply a pre-stain wood conditioner to the Top Panel, followed by your preferred stain.
- 12 Seal the Top Panel with three coats of polyurethane, lightly sanding between coats. Paint the lower cabinet with a durable cabinet-grade enamel, taking care to use a foam roller for a perfectly smooth, modern finish.
Cut List
| Piece | Dimensions | Qty | Source |
|---|---|---|---|
| Top Panel | 60" x 16" x 3/4" | 1 | Edge-Glued Pine Panel |
| Bottom Panel | 58" x 15" x 3/4" | 1 | Birch Plywood |
| Side Panel | 14.75" x 19.25" x 3/4" | 2 | Birch Plywood |
| Divider | 14.75" x 19.25" x 3/4" | 2 | Birch Plywood |
| Side Shelf | 17.5" x 14.5" x 3/4" | 2 | Birch Plywood |
| Center Shelf | 20" x 14.5" x 3/4" | 1 | Birch Plywood |
| Top Stretcher | 56.5" x 2.5" x 3/4" | 2 | Birch Plywood or 1x3 Pine |
| Base Front / Back | 54" x 3.5" x 3/4" | 2 | 1x4 Pine |
| Base Side | 11" x 3.5" x 3/4" | 2 | 1x4 Pine |
| Back Panel | 58" x 19.25" x 1/4" | 1 | 1/4" Plywood or Hardboard |
Tools Needed
Circular Saw or Table SawPocket Hole JigDrill/DriverBrad NailerTape MeasureFraming SquareClampsIron (for edge banding)Random Orbital Sander
📐 Assembly Drawing
Written by
Sawinery's Team
Sawinery is your ultimate destination for all things woodworking — your trusted hub for expert advice, practical guides, and in-depth recommendations. Discover answers to your woodworking questions, along with curated tips on tools, projects, books, videos, DIYs, and hands-on techniques to elevate your craft.
